1. Yêu cầu:
php_fileinfo phải được enable trong file: php\php.ini
extension=php_fileinfo.dll
Lưu ý: cần khởi động lại server nếu bạn đang start
2. Cài đặt
Sửa file composer.json
"require": {
/*.......thêm dòng........*/
"pqb/filemanager-laravel": "2.*"
},
thực hiện lệnh: composer update
Sửa file app.php
'Pqb\FilemanagerLaravel\FilemanagerLaravelServiceProvider',
Facade
'FilemanagerLaravel'=> 'Pqb\FilemanagerLaravel\Facades\FilemanagerLaravel',
chạy lệnh: php artisan vendor:publish
kết quả:
Copied Directory [\vendor\pqb\filemanager-laravel\src\controllers] To [\app\Http\Controllers]
Copied Directory [\vendor\pqb\filemanager-laravel\src\views] To [\resources\views\vendor\filemanager-laravel]
Copied Directory [\vendor\pqb\filemanager-laravel\public] To [\public]
Publishing Complete!
nếu trong quá trình copy báo lỗi
[ReflectionException]
Class App\Http\Controllers\FilemanagerLaravelController does not exist
Thì hãy tạo controller với tên FilemanagerLaravelController
sau đó thực hiện lại lệnh: php artisan vendor:publish
kiểm tra xem nội dung file FilemanagerLaravelController.php có thay đổi hay ko?
nếu không thay đổi ta hãy copy bằng tay file FilemanagerLaravelController.php trong
[\vendor\pqb\filemanager-laravel\src\controllers] To [\app\Http\Controllers]
Sửa file routes.php thêm đoạn sau:
Route::group(array('middleware' => 'auth'), function(){
Route::controller('filemanager', 'FilemanagerLaravelController');
});
Cấu hình thư mục upload hình ảnh:
\public\filemanager\scripts\filemanager.config.js
tìm đến dòng:
"serverRoot": true,
"fileRoot": false,
sửa thành
"serverRoot": true,
"fileRoot": "/public/files/",
toàn bộ hình ảnh bạn upload lên sẽ nằm trong thư mục files/
bây giờ toàn bộ bước cấu hình đã xong, khai báo trong view để dùng:
<textarea id="content" class="content"></textarea>
<script type="text/javascript" src="/public/tinymce/tinymce.min.js"></script>
<script type="text/javascript" src="/public/tinymce/tinymce_editor.js"></script>
<script type="text/javascript">
editor_config.selector = "textarea.content";
editor_config.path_absolute = "/";
editor_config.language = "en_GB";
tinymce.init(editor_config);
</script>
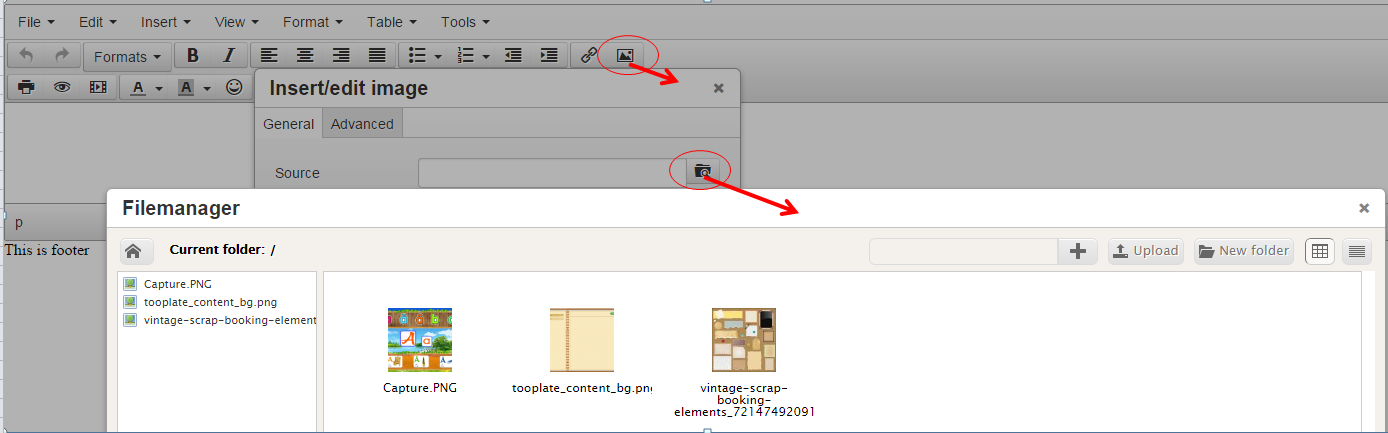
Đây là kết quả sau khi chạy thành công:
3. kiểm tra login mới cho phép truy câp vào thư mục
Thêm file view thông báo lỗi.
resources\views\vendor\filemanager-laravel\filemanager\error.blade.php
sửa file FilemanagerLaravelController.php
public function getShow() {
$f = FilemanagerLaravel::Filemanager();
if(Auth::check()) {
return view('filemanager-laravel::filemanager.index');
} else {
return view('filemanager-laravel::filemanager.error');
}
}
Nguồn tham khảo.
lưu ý: đường dẫn đến file các file js có thể không có /public tùy theo cách ban cấu hình laravel
Ngôn ngữ của texteditor (download)
Showing posts with label laravel5. Show all posts
Sunday, July 5, 2015
Sunday, June 28, 2015
[7] Laravel - Sử dụng HtmlBuilder
Tham khảo
1. Chỉnh sửa file composer.json (thêm vào dòng "illuminate/html": "5.*")
"require": {
"illuminate/html": "5.*"
},
2. Run cmd:
composer update
3. chỉnh sửa file config/app.php
'providers' => [
// ... thêm vào
'Collective\Html\HtmlServiceProvider',
// ...
],
'aliases' => [
// ...thêm vào
'Form' => 'Collective\Html\FormFacade',
'Html' => 'Collective\Html\HtmlFacade',
// ...
],
4. Sử dụng ngoài view
vd muốn sử dụng link đến file css
{!! HTML::style('/public/css/home.css') !!}
Ngoài ra còn có thể sử dụng cách tạo form html khác (tham khảo)
[6] Laravel - Thêm class xử lý vào project
Ví dụ cần thêm class xử lý tạo link từ tên của các đối tượng.
1. Tạo file
App\Common\Link.php
nội dung:
<?php
namespace App\common;
class Link {
public function incrementalHash ($len = 5) {
$charset = "0123456789ABCDEFGHIJKLMNOPQRSTUVWXYZabcdefghijklmnopqrstuvwxyz";
$base = strlen($charset);
$result = '';
$arr = explode(' ', microtime());
$now1 = explode(".",$arr[0]);
$now = $now1[1];
while ($now >= $base) {
$i = $now % $base;
$result = $charset[$i] . $result;
$now /= $base;
}
return substr($result, -$len).$now1[1];
}
public function vietnamese_permalink ($str, $replacement = '-') {
$str = trim($str);
$str = preg_replace("/à|á|ạ|ả|ã|â|ầ|ấ|ậ|ẩ|ẫ|ă|ằ|ắ|ặ|ẳ|ẵ|À|Á|Ạ|Ả|Ã|Â|Ầ|Ấ|Ậ|Ẩ|Ẫ|Ă|Ằ|Ắ|Ặ|Ẳ|Ẵ|å/", 'a', $str);
$str = preg_replace("/è|é|ẹ|ẻ|ẽ|ê|ề|ế|ệ|ể|ễ|È|É|Ẹ|Ẻ|Ẽ|Ê|Ề|Ế|Ệ|Ể|Ễ|ë/", 'e', $str);
$str = preg_replace("/ì|í|ị|ỉ|ĩ|Ì|Í|Ị|Ỉ|Ĩ|î/", 'i', $str);
$str = preg_replace("/ò|ó|ọ|ỏ|õ|ô|ồ|ố|ộ|ổ|ỗ|ơ|ờ|ớ|ợ|ở|ỡ|Ò|Ó|Ọ|Ỏ|Õ|Ô|Ồ|Ố|Ộ|Ổ|Ỗ|Ơ|Ờ|Ớ|Ợ|Ở|Ỡ|ø/", 'o', $str);
$str = preg_replace("/ù|ú|ụ|ủ|ũ|ư|ừ|ứ|ự|ử|ữ|Ù|Ú|Ụ|Ủ|Ũ|Ư|Ừ|Ứ|Ự|Ử|Ữ|ů|û/", 'u', $str);
$str = preg_replace("/ỳ|ý|ỵ|ỷ|ỹ|Ỳ|Ý|Ỵ|Ỷ|Ỹ/", 'y', $str);
$str = preg_replace("/đ|Đ/", 'd', $str);
$str = preg_replace("/ç/", "c", $str);
$str = preg_replace("/ñ/", "n", $str);
$str = preg_replace("/ä|æ/", "ae", $str);
$str = preg_replace("/ö/", "oe", $str);
$str = preg_replace("/ü/", "ue", $str);
$str = preg_replace("/Ä/", "Ae", $str);
$str = preg_replace("/Ü/", "Ue", $str);
$str = preg_replace("/Ö/", "Oe", $str);
$str = preg_replace("/ß/", "ss", $str);
$str = preg_replace("/[^\s\p{Ll}\p{Lm}\p{Lo}\p{Lt}\p{Lu}\p{Nd}]/mu", "", $str);
$str = preg_replace("/\s+/", " ", $str);
$str = trim($str);
$str = str_replace(" ", $replacement, $str);
return strtolower($str);
}
public function getShortLink ($name) {
$shortName = $this -> vietnamese_permalink($name);
$randomChar = substr($this -> incrementalHash(5),5);
return $shortName."-".$randomChar.".html";
}
public function getShortForCatagoryLink ($name, $extension = "") {
$shortName = $this -> vietnamese_permalink($name);
//$randomChar = substr(incrementalHash(5),5);
return $shortName . $extension;
}
}
2. Trong controller chúng ta gọi class link để xử lý như sau:
<?php namespace App\Http\Controllers;
use App\Common\Link;
class WelcomeController extends Controller {
protected $link;
public function __construct() {
$this->link = new Link();
}
public function index() {
echo $this->link->getShortLink("kak kak kak");
exit();
}
}
Saturday, June 27, 2015
[4] Laravel - Migrations database
Link thao khảo
Thư mục chứa file dùng để migrate các table : database\migrations\
Vd file tạo bảng user:
2014_10_12_000000_create_users_table.php
<?php
use Illuminate\Database\Schema\Blueprint;
use Illuminate\Database\Migrations\Migration;
class CreateUsersTable extends Migration {
/**
* Run the migrations.
*
* @return void
*/
public function up()
{
Schema::create('users', function(Blueprint $table)
{
$table->increments('id');
$table->string('name');
$table->string('email')->unique();
$table->string('password', 60);
$table->timestamps();
});
}
/**
* Reverse the migrations.
*
* @return void
*/
public function down()
{
Schema::drop('users');
}
}
Class này có 2 function là up() và down(). Function up() sẽ được gọi khi bạn chạy lệnh php artisan migrate còn function down() sẽ được gọi khi bạn chạy lệnh php artisan migrate:rollback . Các tên hàm theo mình thấy là rất dễ hiểu rồi. Nhìn vào các bạn có thể tưởng tượng được cấu trúc table users như thế nào.
[5] Laravel - Language
Tham khảo.
Thư mục chứa file lang: resources/lang
set lang trong controller
<?php namespace App\Http\Controllers;
use Session;
use App;
class WelcomeController extends Controller {
public function index()
{
//echo Session::get ('locale');
//echo App::getLocale();
App::setLocale('fr');
//echo App::getLocale();
return view('welcome');
}
}
file lang: pagination.php
<?php
return [
'testFr' => 'lang FR',
];
Sử dụng trong view:
{{trans('pagination.testFr')}}
Sunday, May 31, 2015
[3] Laravel - lifecycle
Link tham khảo
Hiểu được yêu cầu luồng trong Laravel
Bằng cách hiểu những yêu cầu luồng
Laravel bạn sẽ có thể không ở chính xác nơi bạn cần phải tập trung cho một công
việc nhất định.
Vòng đời chuẩn là:
![]() |
| Vòng đời |
Yêu cầu HTTP từ Routed tời một Controller
Controller sẽ thực hiện những action và gửi kết quả tới View
View sẽ hiện những kiểu dữ liệu phù hợp và gửi lại HTTP Response
Có rất nhiều trương hợp ngoại lề và bất đồng về luồng ở trên, nhưng điều
này cung cấp cho bạn ba vị trí cơ bản để bắt đầu.
- Routing: trong app/Http/routes.php.
- Controller: trong app/Http/controllers/
- View: trong app/Http/views/.
Một vài ngoại lệ ở trên là:
Route có thể trả về trực tiếp Views
hay Responses, bỏ qua Controller
Filters (trong app/filters.php) có thể xảy ra trước hoặc sau route
Toàn bộ vòng đời của một yêu cầu có thể được chia thành ba phần:
Loading, khởi động và chạy.
![]() |
Bước khởi động
Bước running
[2] Laravel - Controllers
Link tham khảo
Để thêm 1 controler mới ta thực hiện các bước sau
1.Tạo file controller
vào thư mục app/Http/Controllers tạo ra file TestController với nội dung sau:
<?php namespace App\Http\Controllers;
class TestController extends Controller {
/**
**
**
*/
public function index()
{
return view('test.index');
}
}
2.Tạo view
Nhìn đoạn code trên ta thấy function index trả về "test.index" tức là trong thư mục resources/views ( là thư mục chứa toàn bộ view của lavarel) chúng ta phải tạo thêm "test/index.blade.php".
Nội dung file "index.blade.php":
<p>This is CONTROLLER: test</p>
<p>This is VIEW: index</p>
3.Sửa file app\Http\routes.php
Thêm dòng sau vào trong file:
Route::get('test', 'TestController@index');
4. Truyền dữ liệu từ controller ra view
Controller:
<?php
namespace App\Http\Controllers;
use Auth;
use Request;
class LoginController extends Controller {
public function index() {
$user = Auth::user();
return view('login.index', ['user' => $user]);
}
}
View:
Hiển thị 'name'
{{$user['name']}}
4. Truyền dữ liệu từ controller ra view
Controller:
<?php
namespace App\Http\Controllers;
use Auth;
use Request;
class LoginController extends Controller {
public function index() {
$user = Auth::user();
return view('login.index', ['user' => $user]);
}
}
View:
Hiển thị 'name'
{{$user['name']}}
[1] Laravel - Hướng dẫn cài đặt
I. Yêu cầu: PHP >= 5.4
II. Cài đặt
1. OpenSSL PHP Extension
Kiểm tra file php\php.ini đã có "extension=php_openssl.dll" chưa nếu chưa có thì thêm vào
2. Download và cài đặt Composer(download tại đây)
3. Download project lavarel
Dùng CMD di chuyển đến thư mục chứa project (www hoặc htdocs)
"composer create-project laravel/laravel ten-project-cua-ban 5.x --prefer-dist"
chờ cho đến khi project được download xong
4.Kiểm tra kết quả
Vào trình duyệt gõ đường dẫn http://localhost/laravel-5/public, nếu bạn thấy hiện ra như dưới đây là bạn đã cài đặt thành công
Subscribe to:
Comments (Atom)


